I have been testing PernixData FVP in the lab the last few days now, and so far it’s been very impressive. In addition to the product itself, i am mainly interested in automating it through either the API or Powershell. One thing i noticed in the lab environment is that the esxi modules cannot be installed through VUM because PernixData hasn’t been able to get their module signed (yet). And not being able to use VUM means having to enable SSH on every host, log in, install the module, ad naseum.. or does it?
Installing the esxi modules
Through the magic of get-esxcli in powershell we can automate the installation of the module on new and existing hosts, facilitating easier deployment on existing clusters and preventing you from having to bake the module into your esxi installer. While this module was written with PernixData FVP in mind, it is generic and could be used to deploy any vib/zip to your esxi hosts (Think NetApp NFS Vaai plugin, which also had problems installing through VUM on 5.1/5.5).
function install-esximodule {

  param(


    $vcenter,


    $nosigcheck = $false,


    $Datastore,


    $FilePath,


    ]$VMHost
)
Begin {

    #Set some variables
    $patchpath = Get-Item $filepath
    $patchfile = $patchpath.PSChildName
    $depotpath = "/vmfs/volumes/" + $datastore.Name + "/" + $patchfile
    $filetype = ($patchpath).Extension

  }

  Process {
    try {

      #Set variables related to the current host
      $cluster = Get-Cluster -VMHost $VMHost
      $esxcli = Get-EsxCli -VMHost $vmhost -Server $vc

      #Upload the patch
      $fullpath = "vmstore:" + $cluster.Name + "" + $Datastore.Name + "" + $patchfile
      if (!(Test-Path -Path $fullpath)) {
        Copy-DatastoreItem $filepath $fullpath
      }

      # Set the host in maintenance mode
      Set-VMHost -State Maintenance -VMHost $vmhost

      switch ($filetype) {
        ".zip" {$esxcliresult = $esxcli.software.vib.install($depotpath,$false,$false,$false,$false,$nosigcheck,$null,$null,$null)}
        ".vib" {$esxcliresult = $esxcli.software.vib.install($null,$false,$false,$false,$false,$nosigcheck,$null,$null,$depotpath)}
        default {exit "Not a .zip or .vib file, exiting!"}
      }
      if ($esxicliresult.RebootRequired -eq $true) {
        Restart-VMHost $vmhost
        do { sleep 10 } while ($vmhost.State -ne "Maintenance")
      }

      Set-VMHost -State Connected
    }

    catch {

      }
    }
  }

  End {
    Disconnect-VIServer $vc
  }
}
What happens in this script is that we first upload the vib/zip file to a datastore as determined by the user if it doesn’t already exist in that location. It can either be a single datastore or separate datastores if you have multiple clusters with separate storage. Then, we’ll put the host in maintenance mode, after which we’ll use the power of get-esxcli to run esxcli software vib install, without having to touch a single esxi shell or ssh shell.
By using a switch on the extension of the patch file, we can determine wether it’s a vib or zip and as such which vib install command we need to use. We’ll output the result of the esxcli command to a variable and use that to determine wether or not a reboot is required. If it is, we’ll reboot the host, then exit maintenance mode.
If any errors occur during the installation, the try/catch construct will catch that. One of the things i want to improve in this script is error handling, since having esxcli change nothing (because the module might already be installed constitutes an error right now and as such will not take your host out of maintenance mode. In addition, having an option to uninstall modules would be nice as well, but this isn’t easy for every module (PernixData FVP for example does some things during an uninstall/upgradethat require using ssh and can’t be done remotely through esxcli.).
The way to use this function is as follows:
- Use it as a single shot function, by calling install-esximodule -datastore $datastoreobject -filepath $fullpathtopatch -nosigcheck $true/false -vcenter $vcenterobject -vmhost $vmhost. Note that all variables are actually objects, not strings of the hostname. This is something i might fix in the future, but for now you’ll need to connect to your vCenter and store the connection in a variable ( $vc = connect-viserver $dnsorip), store the host you wish to configure in a variable as well ($vmhost = get-vmhost $esxname) and do the same for the datastore ($ds = get-datastore $datastorename).
- Pipe information into it. You could either use all generic settings and do a simple pipe (handy if all your settings are the same for all hosts) or do a foreach-object if you have differencing datastores or vCenters.
Note that this script has not been tested extensively yet, so be mindful if you use it in production and do a few test runs first. But so far, it’s worked on lab servers to provision the PernixData agent in mere minutes.
Installing the PernixData VFP Software
Next up is installing the PernixData FVP Management software. The automatic installation of the SQL server is already described in the installation documentation, so we’ll skip that. The unattended installation of the mangement software is a bit more complex. PernixData FVP is packaged as an installshield installer, and from what i could find there’s no documentation regarding what properties they use in the packaged MSI. So what we’ll do is the following:
- Extract the content of the installshield installer.
- install the MSI in logging mode.
- Extract the msi options from the logs.
- Install the installshield in silent mode using the extracted log options.
Step one was a bit of a pain to find. Installshield uses a myriad of different ways to do things, depending on how software is packaged and what version is used. Unfortunately extracting the files using an archiver such as 7zip doesn’t work, but after some googling we found http://www.tuhh.de/rzt/usc/rz-service/Empirum/Doku/InstallShield_Setup_Parameters.pdf which tells us that the correct way is using /a and that /extract_all does not work with MSI based setups. So the correct command line is
"PernixData FVP Management Server - 1.5.03481.0.exe" /a
Choose your path and finish the extraction.
Then we have the MSI extracted for us. We can now do this one of two ways:
Method 1: Creating an MSI Transform
By using ORCA (or a paid tool such as adminStudio) we can generate a transform file for the MSI extracted earlier, which you can then pass along to the installshield installer by using the /v flag. However, the big problem with this is that for every unique setting you’ll need to either create a new transform or use MSI variables, which defeats the purpose of using a transform in the first place. I haven’t personally tested this, but if you still wish to go this route a good description on how to use ORCA can be found on http://tonyle.ca/blog/?p=33. The advantage of using this method is if you install the software through a software management system such as SCCM or Puppet+Chocolatey that understands MSI/MST’s it becomes a bit easier to manage, upgrade and reinstall.
Method 2: Passing MSI variables to installshield
To retrieve the variables we enter in the installer we’ll have to run the MSI with verbose logging to create an installation log. To do this we’ll cd to the msi’s directory and use msiexec, so our command line would be
msiexec /i "PernixData FVP Management Server.msi" /L*V install.log
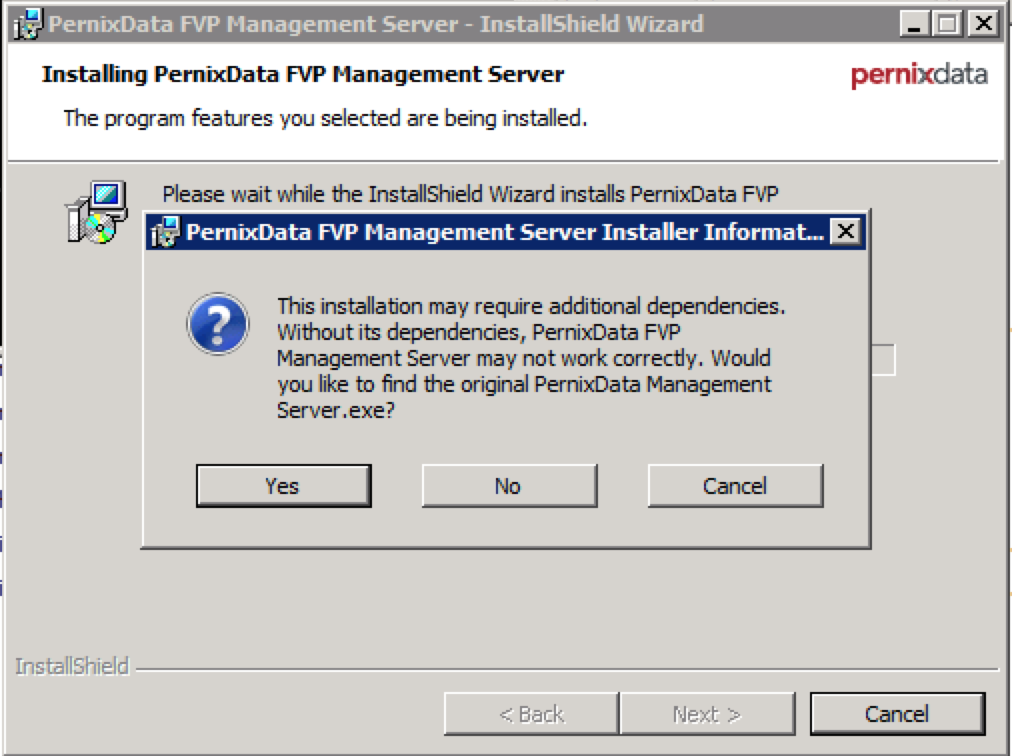
The path to the log can be either absolute or relative, in which case it’ll be created in the current working directory. Now, the answers you’ll give here will be the ones that are written in the logs, so you can easily search for them, but you’ll need to manually input them in the unattended install anyway, so it doesn’t really matter. Follow the installer as usual, with one exception: During the installation you will be asked for the original installshield .exe. This is the file that you extracted the MSI from, not the MSI itself.

Select “yes” and then browse to the original installer.
After a while you’ll have a log file of about 350K, mostly containing non-interesting garbage. What we’re interested in here is the lines that contain the words “PROPERTY CHANGE”. These indicate that a property has been changed during the installation. Even after using grep to filter these lines we’re still left with 29 KB worth of plain text, but we’ll manage..
After doing some manual filtering you can find the interesting properties in this file, mainly by scrolling through it and searching for the variables you entered earlier. The whole list is actually as follows, retrieved from looking at the SecureCustomProperties field in the MSI by looking at it with ORCA:
USERNAME;COMPANYNAME;ISX_SERIALNUM;SUPPORTDIR;INSTALLDIR;PSMODULE;SERVER;IS_SQLSERVER_LIST;IS_SQLSERVER_DATABASE;IS_SQLSERVER_AUTHENTICATION;IS_SQLSERVER_USERNAME;IS_SQLSERVER_SERVER;IS_SQLSERVER_PASSWORD;TEXTLABEL1;IS_NET_API_LOGON_USERNAME;TEXTLABEL;IS_NET_API_LOGON_PASSWORD;IS_NEW_USER_CONFIRM_TEXT;IS_NEW_USER_SERVER_TEXT;IS_NEW_USER_GROUP_TEXT;IS_NEW_USER_NAME_TEXT;IS_NET_API_NEW_USER_PASSWORD;IS_NET_API_NEW_USER_NAME;IS_NET_API_NEW_USER_CONFIRM;IS_NEW_USER_PASSWORD_TEXT;IS_NET_API_NEW_USER_SERVER;IS_NET_API_NEW_USER_GROUP;IS_NET_API_GROUP_LIST;ISPROP;IS_NET_API_SERVER_LIST;IS_NET_API_SERVER_NEW_USER_LIST;IS_PROP1;IS_NET_API_USER_LIST;TEXTLABEL2;IS_NET_API_LOGON_DOMAIN_TOKEN;IS_NET_API_LOGON_USERNAME_TOKEN;IS_VC_SERVER_USERNAME;IS_VC_SERVER_PASSWORD;IS_VC_SERVER_NAME;IS_VC_SERVER_NAME;POWERSHELLMODULEPATH;POWERSHELLVERSION;USERACCOUNT;PRNXMS_PORT_NUMBER;FQDN_OR_IPADDRESS;ISACTIONPROP1;PRNXMS_HTTPS_PORT_NUMBER
From this list you should be able to find the properties you’d need to pass along to the installer. For example, the way i’ve installed the PernixData FVP management software in the lab is with the following command line:
"PernixData FVP Management Server - 1.5.03481.0.exe" /V" /qb
USERNAME=ITQ
COMPANYNAME=ITQ
IS_VC_SERVER_NAME=192.168.200.93
IS_SQLSERVER_SERVER=PRNX-MGMTprnx_sqlexp
IS_NET_API_LOGON_USERNAME=root
IS_NET_API_LOGON_PASSWORD=vmware
FQDN_OR_IPADDRESS=192.168.200.94
IS_SQL_SERVER_AUTHENTICATION=0"
Be mindful that i’ve posted the command on separate lines for readability, but if you were to post it on one line there should be spaces between every property. If you would like to do a complete hands-off install you can use /qn instead of /qb and place a /S before the /V.
Next article: automated creation of PernixData FVP clusters, automated addition of local SSD/Flash storage to a cluster and automated per-vm acceleration policies (for use in vCO/vCAC for example).